
rwasa + HHVM + WordPress
Yes, as exotic as it ever gets.
So a couple of nights ago I got a weird e-mail from “Diana” at dianabem501@gmail.com. It said:
I have visit your blog https://codeseekah.com/
I can pay you $200 per month. Contact me for more info.
Intrigued, decided to respond and see where this scam went. I replied “What for?”…
Munin graphs are often too ugly to show off on public-facing pages, and while the control panel is usually enough to get bare information from graphs, customizing these to become interactive and fancy may prove to be quite a task.

I’m going to use Google Charts to output the number of requests per second my server is processing (the data is a snapshot and does not change in this case). Fortunately, all data collected by the Munin master is stored in RRD format and can be retrieved simply by using the rrdtool fetch command, or by using the PHP RRD library if you’re using PHP, or python-rrdtool if you’re using Python.
I’ve been hooked on Rust lately, trying to wrap my head around the whole borrowing, lifetimes and boxes parade. What’s tough with young Rust is that most sample code out there is outdated, answers to questions no longer correct, documentation leaves a lot to be desired.
I decided to learn a bit of Rust by writing a FUSE, using the libfuse shared library (yes, I know there’s a Rust implementation here). So I’m looking at FFI to get me started and writing the main libfuse signature.
fn fuse_main_real(argc: c_int, argv: *const *const c_char, op: *const fuse_operations, op_size: size_t, user_data: *const c_void) -> c_int;
The huge challenge I found myself with was trying to convert os::args to *const *const c_char. All the code out there seems to be outdated, nothing worked for me. I was getting lifetime errors, borrowing errors and even move errors for hours on end. And when there were no borrowing errors I was slapped on the face with segmentation faults.
After a lot of thinking, reading the basics several times, I managed to convert the command line arguments given to my Rust program into the needed pointer to a pointer of chars. Here’s how it looks:
let argv:Vec<ffi::CString> = os::args_as_bytes().into_iter().map(|arg| { ffi::CString::from_vec(arg) } ).collect();
let args:Vec<*const c_char> = argv.into_iter().map(|arg| { arg.as_ptr() } ).collect();
fuse_main_real(args.len() as c_int, args.as_ptr() as *const *const c_char, .... );
Let’s go through this step by step. First we grab a Vec<Vec<u8>> from os::args_as_bytes, iterate and collect a Vec of null-terminated ffi::CStrings. Next, iterate over each CString and collect a pointer to the char array it’s being backed by. The rest is easy.
Why two variables? I found that chaining ffi::CString::from_vec(arg).as_ptr() would not work because once the pointers have been collected the created CString is freed once the map is done. So we need to keep the CStrings around in order to the pointers to be available for use.
A seemingly trivial task turned out to be quite difficult to get to. I’ve probably done it incorrectly either way 😀 it must be, since it’s a highly inefficient solution (looked at the emitted assembly and those two calls are awfully large).
Still a lot to learn about this ever-evolving, unstable but fun language. By the way, I used rustc 1.0.0-dev for the above.
Have you tried turning it off and on again?
This is usually the goto solution for failing/frozen services. Something’s wrong let’s just restart whatever. It gets as absurd as running a restart cronjob every hour or two! Of course restarting helps, but it’s not the best solution. It’s often better to find out what’s wrong to begin with, why the thing that is supposed to work is not working anymore.
I decided to relax a bit and assemble a kit I had lying around for quite a while. It was a SIM Reader Kit v1 from adafruit. Having assembled the tiny board, while searching for a serial cable, I realized that I didn’t have a serial port on my computer to begin with. The board did have FTDI pinouts, but I didn’t have an FTDI adapter available. After dismantling a PIC-based CAN reader that I had luck interfacing with via USB last year, and fiddling around with it to try and get the FTDI chip to transmit and receive I was about to give up.
Then I remembered I had an Arduino Uno that I thought had an FTDI chip. It didn’t, but I did find out that it in tri-state mode (with the Atmel chip in reset) I could send and receive data to pins 0 and 1 (RX and TX respectively) by simply writing and reading from the virtual serial device created by Linux after connecting the Uno via USB.
Alas, nothing, the SIM reader board didn’t seem to respond. After looking online for how SIM cards work, I started reading about the T0 protocol and found out that by default the SIM is idling and will not respond until it is reset (by setting its RST pin to low then to high). This, I think, is usually taken care of using the RTS pin of the FTDI, but unfortunately the Uno doesn’t have one. I had to add a switch that brings the RTS pin of the serial port to ground when connected.
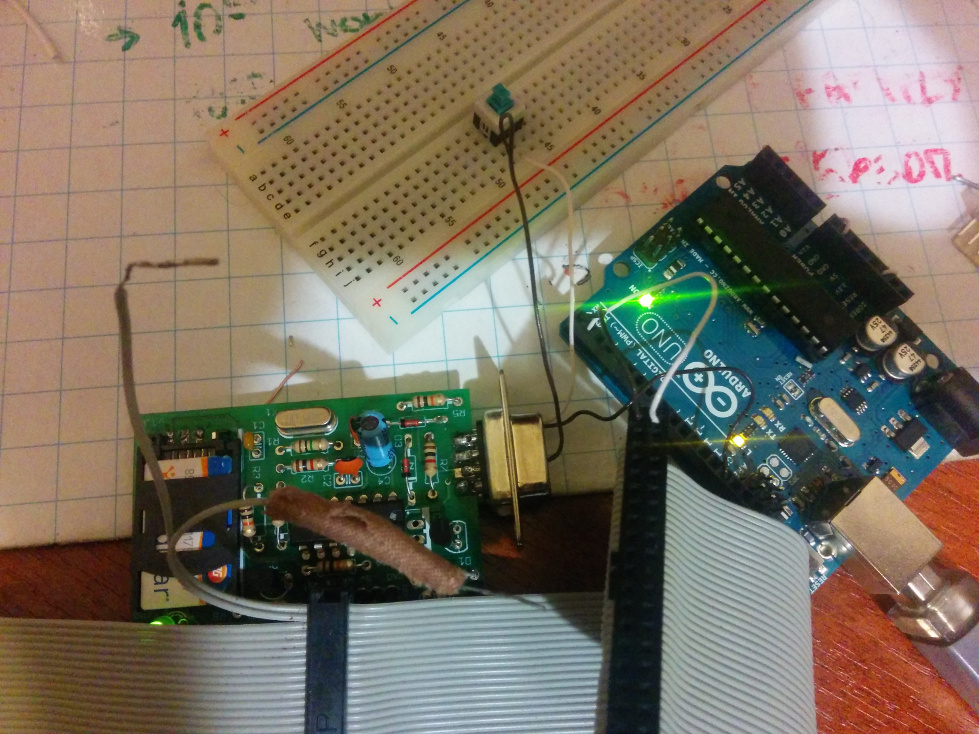
Sure enough, some bytes started flowing in.
So:
Everything worked and I was able to enjoy the SIM reader without having an FTDI R232 to UART (serial) board handy or a serial port on my computer thanks to the Arduino Uno.
I was honored to give a talk at the second WordCamp Russia event. Like last year, I decided to speak about a general development topic and how it can be applied to WordPress. This time my talk was on profiling.
Here’s a video. English subtitles are available by selecting “Subtitles” in the player.
And here’s wptop on GitHub, an XHProf-based WordPress plugin that gives you an overview of your WordPress website performance. Feel free to give it a spin and let me know what you think.
The cal utility in Linux does not, unfortunately allow one to output the calendar in landscape mode (4 columns or more). The default cal -y output mode will display 3 columns. Here’s a hack-around:
yearly function.cal_month m4 variable, which will hold the fourth column.m3.next = NULL and change it to m3.next = m4;, add m4.next = NULL;.for loop change the 3 to a 4 in the month += ... clause.make./cal -y should yield four columns instead of three.You can probably make cal output 2, 5 or 6 columns in a similar fashion. Crazy hack, eh?
Update 4th September, 2014: I have sent in a patch to the `util-linux` library with a new feature – landscape mode. `-l` and `–landscape` flags will stretch the year output as much as two times. Pull request can be accessed on their GitHub upstream mirror: https://github.com/karelzak/util-linux/pull/117
Uploading files to Google Drive from the command line without any fancy agents, exotic libraries, dependencies should be simple. And here’s how it’s done…
First of all we need an Access Token for the Google Drive account we’re uploading to. This can be attained in many different ways. I’ve written a simple bash script to get Google API authentication and access tokens, which can be found here. Note: due to a bug somewhere, Google doesn’t seem to like drive scopes, so I’m using the all-enveloping https://docs.google.com/feeds for now.
Once you have you Access Token, calling the Google Drive API is simple using mere cURL. Multipart uploads allow you to inject metadata along with your file data in one request.
In short, you make a PUT or POST request to https://www.googleapis.com/upload/drive/v2/files/?uploadType=multipart, with an Authorization: Bearer $ACCESS_TOKEN header, and a Content-Type: multipart/related; boundary=$BOUNDARY content type.
The payload should look like so:
--randomboundary
Content-Type: application/json; charset=UTF-8

{ "title": "My document", "parents": [ { "id": "xxxxxxxxx" } ] }

--randomboundary
Content-Type: application/text

DATA HERE, KTHNX!

--randomboundary
The whole script can be found here: https://github.com/soulseekah/bash-utils/blob/master/google-drive-upload/upload.sh. As you can see, we feed the whole file from stdin along with the necessary boundaries.
The “parents” argument “id” should be set to the ID of a folder in Google Drive. If left empty, the file will be uploaded to the root folder. You can get the ID from the URL in your Google Drive when visiting a folder. A list of mime-types for the file can be found in this stackoverflow answer.
Hope this helps folks out there that want to upload files to Google Drive from the command line.